基本のおさらい
領域、ウィンドウ、レイアウト
GNU screenでは管理している各プロセスの事をウィンドウ(window)呼びます。
画面分割をして区切られた部分は領域(region)といいます。
さらに、区切られた状態をレイアウト(layout)と呼びます。
領域分割
Escape+?
コマンド
動作
Ssplit
横分割
|split -v
縦分割
Xremove
現在の領域削除
Qonly
現在の領域を全体表示
辺りが領域を操作するコマンドになります
1
領域移動
Escape+?
コマンド
動作
Tabfocus
次の領域に移動
-
focus up
上の領域に移動
-
focus down
下の領域に移動
-
focus right
右の領域に移動
-
focus left
左の領域に移動
領域間の移動はfocusコマンドで出来ますが、focusは引数を取れて、
up, down, top, bottomの様に方向を指定できます。
ウィンドウの変更
Escape+?
コマンド
動作
nnext
次のウィンドウにスイッチ
pprev
前のウィンドウにスイッチ
-other
直前に表示していたウィンドウにスイッチ
Numberselect Number
Numberは数字、該当するウィンドウにスイッチ
cscreen
新しいシェルウィンドウを作成
kkill
現在のウィンドウを停止、削除
wwindows
ウィンドウリストを表示、選択したものにスイッチ
レイアウト
コマンド
動作
layout new [layout]
新しいレイアウトを(layoutという名前で)作成
layout remove [layout]
layoutまたは現在のレイアウトを削除
layout select layout
layoutを表示
layout next
次のレイアウトを表示
layout prev
前のレイアウトを表示
layout Number
Numberは数字、該当するレイアウトを表示
layout show
現在あるレイアウトを表示
layout autosave off
レイアウトを固定(自動で変更を保存しない。デフォルトはon)
レイアウトにはデフォルトでEscapeキーに割り当てられてるものはありません。
.screenrcでのキーバインド設定ウィンドウ分割
ウィンドウを縦横4分割にして使うことが多いので、
(Ctrl -)s に最初に3つウィンドウを作ってから
4分割するコマンドを割り当てています。
また、ウィンドウを一旦作った後でレイアウトが変更された後、
また4分割に戻すキーを(Ctrl -)r
に割り当てています。
1
2
3
4
5
6
7
# Make 4 window with new 4 screen
bind s eval 'screen' 'screen' 'screen' 'source $HOME/.screen/4-windows.layout'
bind ^s eval 'screen' 'screen' 'screen' 'source $HOME/.screen/4-windows.layout'

# Make 4 window with no new screen
bind r eval 'source $HOME/.screen/4-windows.layout'
bind ^r eval 'source $HOME/.screen/4-windows.layout'
ここで.screen以下に予めレイアウトコマンドを書いた設定ファイルを置いてあって、
それを実行しています。
4-windows.layout 1
2
3
4
5
6
7
8
9
10
11
12
select 0
split
split -v
focus
select 1
focus
select 2
split -v
focus
select 3
focus
このファイルは下でも使いますが、他のレイアウトファイルも含めて
ファイルはGitHubにあります
(.screenrc )。
領域リサイズ
領域のリサイズを簡単にするために、クラスを使って連続的に変更できる様にしてあります。
Ctrl -a e でresizeという状態に入って、
その後h /l /j /k で
縦横の幅を1文字ずつ連続的に変更できます。
1
2
3
4
5
6
7
8
9
10
11
# Resize window
bind e eval 'command -c resize' 'echo "Resize window"'
bind ^e eval 'command -c resize' 'echo "Resize window"'
bind -c resize h eval 'command -c resize' 'resize -h -1'
bind -c resize l eval 'command -c resize' 'resize -h +1'
bind -c resize j eval 'command -c resize' 'resize -v +1'
bind -c resize k eval 'command -c resize' 'resize -v -1'
bind -c resize ^h eval 'command -c resize' 'resize -h -1'
bind -c resize ^l eval 'command -c resize' 'resize -h +1'
bind -c resize ^j eval 'command -c resize' 'resize -v +1'
bind -c resize ^k eval 'command -c resize' 'resize -v -1'
以前書いたvimでsubmodeを使ってサイズを変更する
2
レイアウトコマンド
レイアウト関連はlayoutというクラスでまとめます。
1
2
3
4
5
6
7
8
9
10
11
12
13
14
15
16
17
18
19
20
21
22
23
24
25
26
27
28
29
30
31
32
33
34
35
36
37
38
39
40
41
42
43
44
45
46
47
48
49
50
51
52
53
54
55
56
57
58
59
60
61
62
# Layout
# Layout command prefix C-q
bind ^q eval 'command -c layout' 'layout show'
bind -c layout ^q eval 'command -c layout' 'layout show'
# Make/Remove layout
bind -c layout c eval 'command -c layout' 'layout new' 'layout show'
bind -c layout x eval 'command -c layout' 'layout remove' 'layout show'
# Modify title/number
bind -c layout T colon 'layout title '
bind -c layout N colon 'layout number '
# Go to Next/Previous layout
bind -c layout n eval 'layout next' 'layout show'
bind -c layout p eval 'layout prev' 'layout show'
bind -c layout ^N eval 'command -c layout' 'layout next' 'layout show'
bind -c layout ^P eval 'command -c layout' 'layout prev' 'layout show'
# Choose n-th layout
bind -c layout 0 eval 'command -c layout' 'layout select 0' 'layout show'
bind -c layout 1 eval 'command -c layout' 'layout select 1' 'layout show'
bind -c layout 2 eval 'command -c layout' 'layout select 2' 'layout show'
bind -c layout 3 eval 'command -c layout' 'layout select 3' 'layout show'
bind -c layout 4 eval 'command -c layout' 'layout select 4' 'layout show'
bind -c layout 5 eval 'command -c layout' 'layout select 5' 'layout show'
bind -c layout 6 eval 'command -c layout' 'layout select 6' 'layout show'
bind -c layout 7 eval 'command -c layout' 'layout select 7' 'layout show'
bind -c layout 8 eval 'command -c layout' 'layout select 8' 'layout show'
bind -c layout 9 eval 'command -c layout' 'layout select 9' 'layout show'
# Initialize layouts
bind -c layout i eval 'screen' 'screen' 'screen' 'source $HOME/.screen/all.layout'
bind -c layout ^i eval 'screen' 'screen' 'screen' 'source $HOME/.screen/all.layout'
# Reset layouts
bind -c layout r eval 'source $HOME/.screen/all.layout'
bind -c layout ^r eval 'source $HOME/.screen/all.layout'
# Set layout
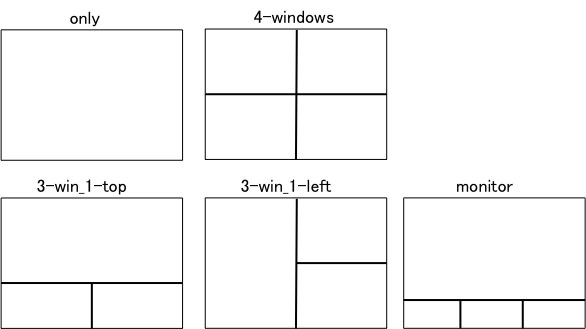
bind -c layout m eval 'command -c layoutm' 'echo "0 only, l 4-windows, 2 3-win_1-top, 3 3-win_1-top, 4 monitor (1 top, 3 small bottoms), 5 split, 6 vsplit, "'
bind -c layoutm 0 eval 'source $HOME/.screen/only.layout'
bind -c layoutm 1 eval 'source $HOME/.screen/4-windows.layout'
bind -c layoutm 2 eval 'source $HOME/.screen/3-win_1-top.layout'
bind -c layoutm 3 eval 'source $HOME/.screen/3-win_1-left.layout'
bind -c layoutm 4 eval 'source $HOME/.screen/monitor.layout'
bind -c layoutm 5 eval 'source $HOME/.screen/split.layout'
bind -c layoutm 6 eval 'source $HOME/.screen/vsplit.layout'
# Save layout
bind -c layout s eval 'command -c layouts' 'layout show'
bind -c layouts 0 eval 'layout save 0' 'echo "save to 0"'
bind -c layouts 1 eval 'layout save 1' 'echo "save to 1"'
bind -c layouts 2 eval 'layout save 2' 'echo "save to 2"'
bind -c layouts 3 eval 'layout save 3' 'echo "save to 3"'
bind -c layouts 4 eval 'layout save 4' 'echo "save to 4"'
bind -c layouts 5 eval 'layout save 5' 'echo "save to 5"'
bind -c layouts 6 eval 'layout save 6' 'echo "save to 6"'
bind -c layouts 7 eval 'layout save 7' 'echo "save to 7"'
bind -c layouts 8 eval 'layout save 8' 'echo "save to 8"'
bind -c layouts 9 eval 'layout save 9' 'echo "save to 9"'
まず、Ctrl -a Ctrl -q でlayoutクラスに突入。
ついでに現在のレイアウトも表示。
c /x で新しいレイアウトの作成/現在のレイアウトの削除。
T /N でタイトルの変更と番号の変更。
colon + コマンドで入力待ち状態にできるのでT の場合には
タイトル入力待ちになり、入力してEnterすると現在のレイアウトのタイトルが変更できます。
(Ctrl -)c /x でレイアウトを前後に変更。
数字入力でその番号のレイアウトを表示。
そして、(Ctrl -)i でレイアウトを初期化します。
$HOME/.screen/
と言うディレクトリに用意してあるファイルを使います。
4つのウィンドウを使うのが前提で、まず、0番のウィンドウが有るとして、
3つ新たにウィンドウを作ります。
その後でall.layout
と言うファイルを読み込んでますが、この中では
.screen
ディレクトリに有る
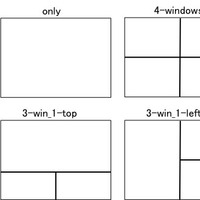
only 、
4-windows 、
3-win 1-top 、
3-win 1-left 、
monitor 、
というファイルを読み込んでいます。
それぞれ読み込む時に
1
2
3
4
5
remove 4 -windows
layout new 4 -windows
source $HOME /.screen/4-windows.layout
layout save 4 -windows
layout autosave off
と言った感じで、
重複しないように同じ名前のレイアウトがあれば消す
まず新しいレイアウトを作る
設定ファイルを読み込む
そのレイアウトを保存
さらに自動で変更が保存されないように固定
をしています。最初のonlyの部分だけは変更が自動保存される様になっています。
(layout autosaveはレイアウト毎に決まっています)
このコマンドをファイルを使わないで全部書くと前回書いた
3 sourceで読み込むことが必要です。
上で設定されてるレイアウトはこんな感じ。
そして、(Ctrl -)r ではこのレイアウト群のリセットを行います。
その次ではm で新たにlayoutmと言うクラスに入り、
番号指定によって現在の表示を指定のレイアウトに変更出来ます。
最後はs で新たにlayoutsと言うクラスに入り、
番号指定で現在のレイアウトを該当番号の場所に保存します。
参考:
これからの「GNU Screen」の話をしよう - Keep It Simple, Stupid
開発版GNU Screenのlayoutを使ってみよう - Keep It Simple, Stupid
追記: 2014/05/29
レイアウト設定をアップデートしました。
GNU screenでのレイアウトの整理 2
追記ここまで